How The Homepage Builder Works
How the Homepage Builder works
Most WooCommerce themes hand you a blank front page and expect you to install a page builder — Elementor, WPBakery, Divi — then drag dozens of widgets onto a canvas, fight their CSS to look mobile-decent, and watch your store get heavier with every plugin you add. Yaxii COD takes the opposite approach. The homepage is built from a fixed set of six pre-engineered sections, each already mobile-first, already styled to match your brand colors, already optimized for fast loading on shared hosting. You do not install a page builder. You do not write code. You pick which sections you want, arrange them in the order you want, fill in their content, and save. This native layout system is the reason your store loads in a second or two instead of eight, and the reason a fresh install looks production-ready out of the box.
Opening the Homepage Builder
In your WordPress dashboard, go to Yaxii COD > Settings, then click the Homepage Layout tab in the sidebar. You see a vertical list of sections — each one is a building block for your homepage. Sections appear on your live storefront in the same order they appear in this list, from top to bottom.
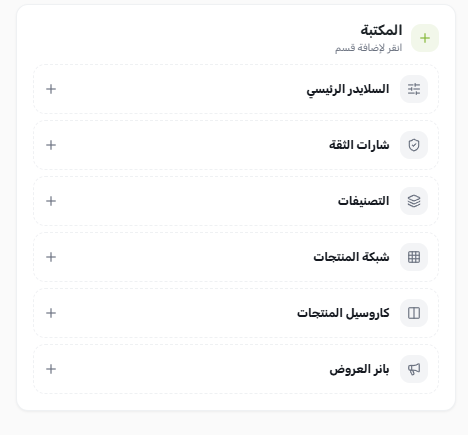
The six available sections
| Section type | What it does | Typical placement |
|---|---|---|
| Hero Slider | A full-width image carousel with heading, subheading, and a call-to-action button — perfect for the top of the page. | Very top of the homepage |
| Trust Badges | A row of icons signaling that your store is safe to buy from (Cash on Delivery, Fast Delivery, Satisfaction Guaranteed). | Right under the hero slider |
| Category Row | A horizontal scroll of category thumbnails (circles or squares) that lets customers jump directly to product categories. | Above the first product showcase |
| Product Carousel | A horizontal sliding row of products (best-sellers, on-sale, latest, or a chosen category). Supports an optional flash-sale countdown. | Middle of the homepage for promotions |
| Product Grid | A traditional grid of products with optional pagination — for showcasing your full selection. | Lower on the homepage as the main catalog window |
| Promo Banner | A clickable promotional image with overlay text, available in full-image or split layout. | Between product sections to break up the page |
Reordering sections
Every section card in the list has a drag handle on its left edge. Click and hold the handle, then drag the section up or down to reposition it. Release to drop. The new order is reflected on your storefront after you save.
Enabling and disabling sections
Each section card has an on/off toggle. Switch it off to hide the section from the live storefront without deleting it — the section keeps all its configured content and you can switch it back on at any time. This is useful when you want to temporarily hide a Flash Sale carousel after the promotion ends, then bring it back for the next campaign without rebuilding the content.
Adding a new section
- 1Open the Homepage BuilderGo to Yaxii COD > Settings > Homepage Layout.
- 2Click Add SectionThe Add Section button is at the bottom of the section list. Click it to open a menu listing the six available section types.
- 3Choose a section typePick the section type you want to add (for example, Product Carousel). A new section card is inserted at the bottom of the list, prefilled with sensible defaults.
- 4Configure the sectionClick the section card to expand it. Fill in the configurable fields — title, data source, image upload, and so on. Each section type has its own set of fields, covered in the section-specific articles that follow.
- 5Save SettingsClick the Save Settings button at the top of the panel. The new section appears on your live homepage immediately.
Removing a section
To permanently delete a section, click the delete icon (a trash can) on the section card. Removal is immediate — the section and all its configured content are gone. If you only want to hide a section temporarily, use the on/off toggle instead so you can bring it back later with its content intact.
What you see on a fresh install
If you have not configured any sections yet — for example, right after installing the theme — your homepage falls back to a simple product grid so your store is never blank. As soon as you save your first custom layout, the fallback disappears and your configured sections take over.
What’s Next?
You understand how the builder works. Now configure your first section — the Hero Slider — which sits at the very top of the homepage and is the first thing every visitor sees.