Product Page And Swatches
Product Page Layout and Color Swatches
The product page is where browsing turns into buying. The default WooCommerce product page is a developer-friendly catalog view — SKU, categories, tags, “Additional information” tabs, related products three rows deep — none of which converts a COD customer scrolling on their phone. Yaxii COD strips this page back to the essentials, lets you decide what to show and where, and replaces dropdown-driven variation pickers with tappable color swatches. The result is a page that asks one question — “Do you want this?” — and gives the buyer a single, focused way to answer yes.
Opening the Product Page settings
Go to Yaxii COD > Settings and click the Product Page tab in the sidebar.
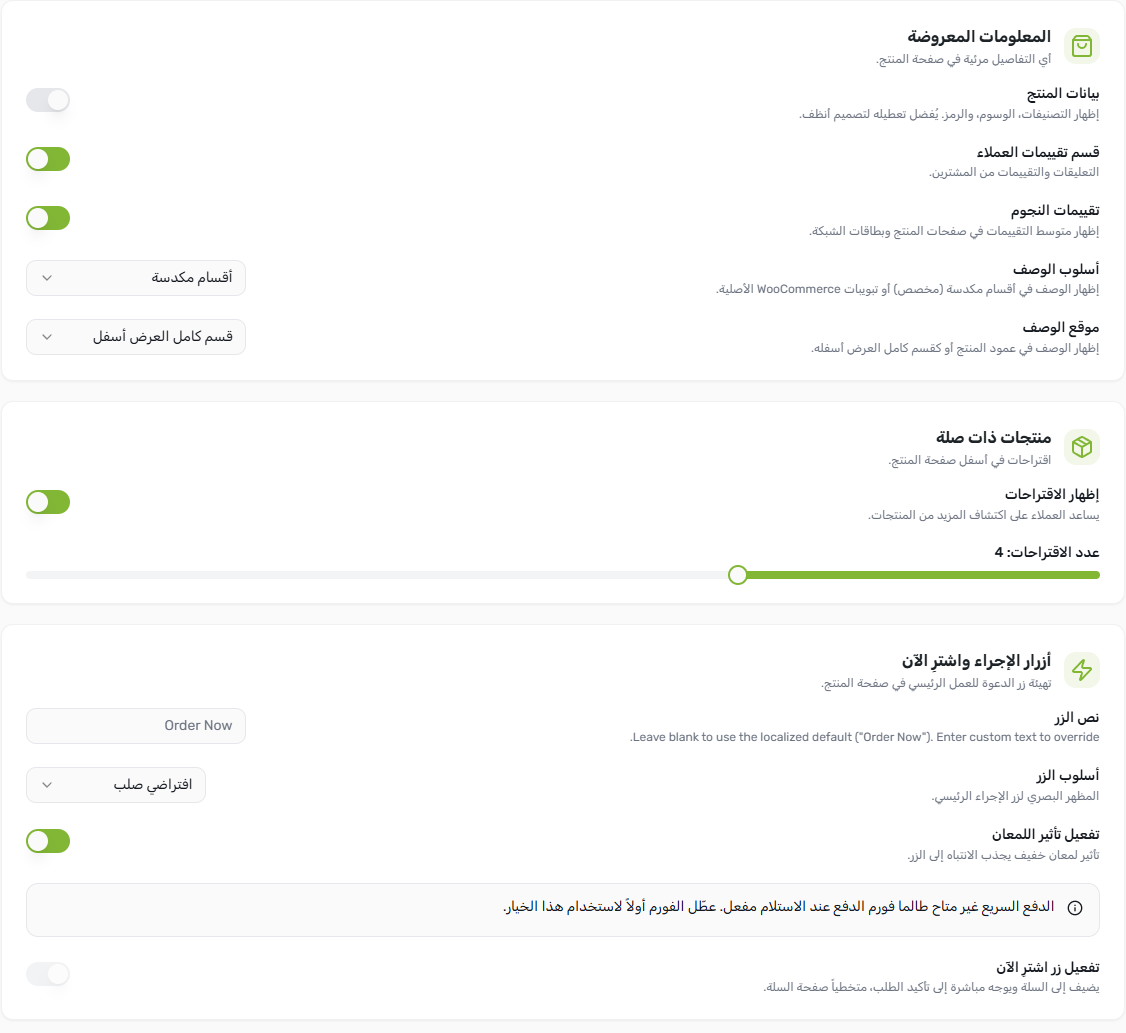
Layout and visibility settings
| Setting | What it controls | Conversion impact |
|---|---|---|
| Show product meta | The block under the price showing SKU, Categories, and Tags. Off by default. | Off removes visual clutter that no COD customer reads — pure noise reduction. |
| Show reviews | The reviews tab and section under the product. On by default. | Strongly recommended on — social proof is the single most effective conversion lever for first-time visitors. |
| Enable product ratings | Whether stars appear next to the product title. On by default. | Stars near the title raise click-through; turn off only if you have no reviews yet and an empty star row would hurt trust. |
| Description placement | Where the long description appears. Below the form (default — keeps the buying decision at the top) or Above for content-heavy products. | Below is almost always the right choice for COD — the buyer needs to see the form, not read paragraphs. |
| Description style | How the description renders. Stacked shows it as one continuous block ; the alternative renders it inside a tabbed component. | Stacked is more mobile-friendly — tabs hide content behind taps that customers rarely make. |
| Show related products | Whether a “You may also like” row appears at the bottom. | On keeps the session alive when the customer is not ready to buy this exact product — small but consistent uplift. |
| Related products count | How many products appear in the related row (typically 4). | Four is the sweet spot — enough variety to interest, few enough to fit on one mobile screen. |
Building a high-converting product page
- 1Open the Product Page tabGo to Yaxii COD > Settings > Product Page.
- 2Turn off product metaThe SKU / Categories / Tags block is developer signage. COD customers do not read it.
- 3Keep reviews and ratings onEven three or four real reviews convert more visitors than no reviews. Encourage customers to leave a review after delivery.
- 4Place the description below the formThis keeps the price, image, variations, and Fast Checkout form in the buyer’s first scroll. The description rewards customers who want more detail without distracting those who do not.
- 5Use the stacked description styleStacked content reads better on small screens than tabs. Tabs hide content behind taps that mobile shoppers rarely make.
- 6Show 4 related productsA short “You may also like” row keeps the session warm if this product is not the one. Avoid more than 4 — it becomes a maze.
- 7Save SettingsClick Save Settings.
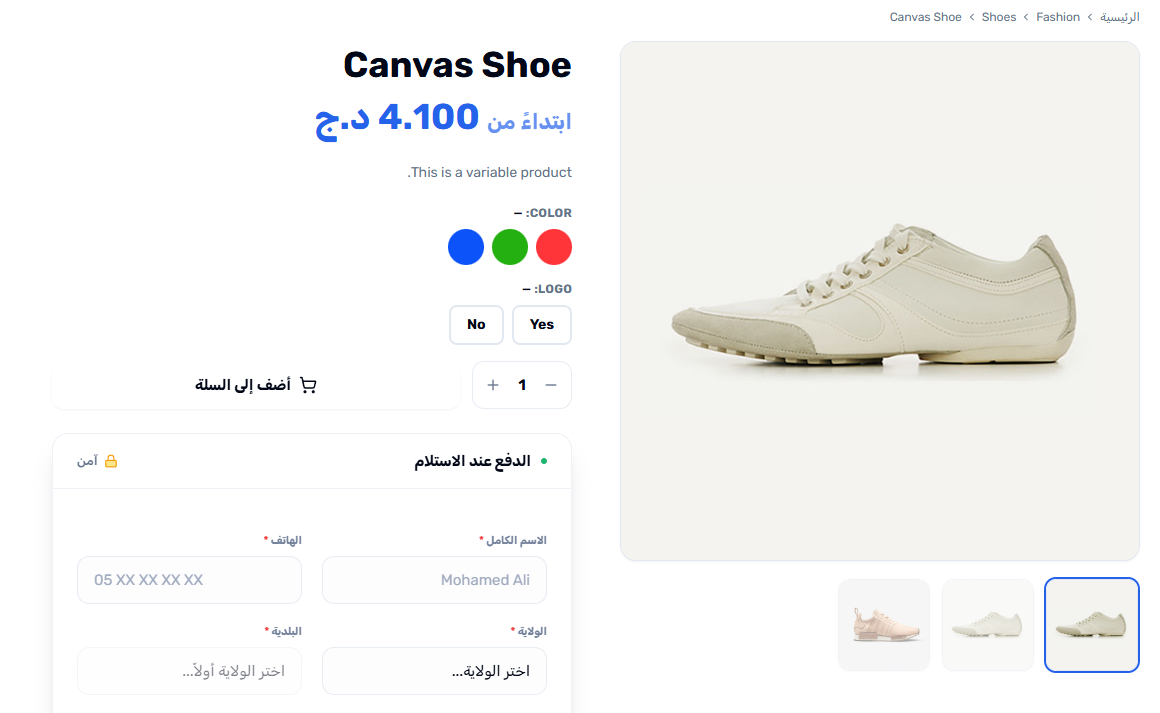
Color swatches for variable products
When you sell a product in multiple colors, the default WooCommerce experience is a dropdown of color names — “Red”, “Blue”, “Olive Green” — which is unscannable on mobile and forces the customer to guess what each color actually looks like. Yaxii COD replaces those dropdowns with tappable color swatches that show the actual color, dramatically reducing the cognitive load of choosing a variation.
Adding a color to your Color attribute
- 1Open the Color attributeIn the WordPress admin, go to Products > Attributes, find the Color attribute, and click Configure terms on its row.
- 2Add or edit a color termEach row represents one color (for example, “Black”, “Navy”, “Burgundy”). Click Add new color for a new color, or hover an existing row and click Edit.
- 3Pick the visual colorOn the edit screen, you see a Color picker field. Click the swatch to open the color wheel, or paste a hex code (for example, #2A4D6F). This is the color customers will see on the product page.
- 4Save the termClick Update. The new color is now ready to assign to product variations.
- 5Assign the color to a product variationEdit a variable product, open the Variations section, and pick the Color term for each variation. On the storefront, customers see a row of color circles instead of a dropdown.
What’s Next?
Your product page is optimized. Next, configure the cart — the second sales surface that decides whether a customer adds one more item before checkout or leaves the order at its original size.